How to write cursive I and i
Capital I is one tall loop drawn from the baseline, up the left side and down the right, with a small curl at the bottom. Lowercase i is a short stroke down from the midline, a tail, and a dot added last.
Capital I
Tall: baseline to topline.
At the baseline, right of the middle of the letter.
Low on the left, inside the letter. The next letter starts on its own.
Lowercase i
Short: baseline to midline.
At the midline. At the start of a word, many people add a short upstroke from the baseline first.
Low on the right, swinging up. The dot is added last.
Capital I, second form
An I that starts at the top: a small loop, a stroke down to the baseline, and a loop at the bottom that swings up into the next letter.
Inside the top loop, on the right, about a sixth of the way down from the topline.
Low on the right, swinging up into the next letter.
Dot the i after you finish the word, not as you go. The dot sits about halfway between the midline and the topline, straight above the stroke.
Common mistakes with capital I
- The loop is drawn narrow and the hook left off, so the I reads as a cursive l or a 1.
- The bottom hook is pulled out to the right as a tail, so it looks like the I joins when it should stop.
- The start is placed at the midline instead of the baseline, so the bottom of the loop is left open.
Common mistakes with lowercase i
- The dot is forgotten, so the i reads as part of a u.
- The i is drawn as tall as a t, or the t as short as an i, so the two are confused.
- The downstroke is looped instead of straight, so the i becomes an e.
Joining i to other letters
Capital I lifts before the next letter, so start the second letter fresh. Practice the lowercase pairs until each join feels like one movement.
Print a practice sheet for I and i
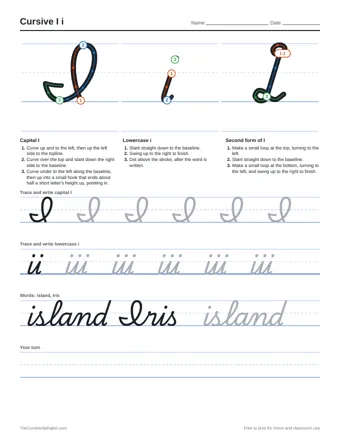
The sheet has the numbered stroke guide for both letters, rows to trace, two practice words and a blank row for writing on your own.